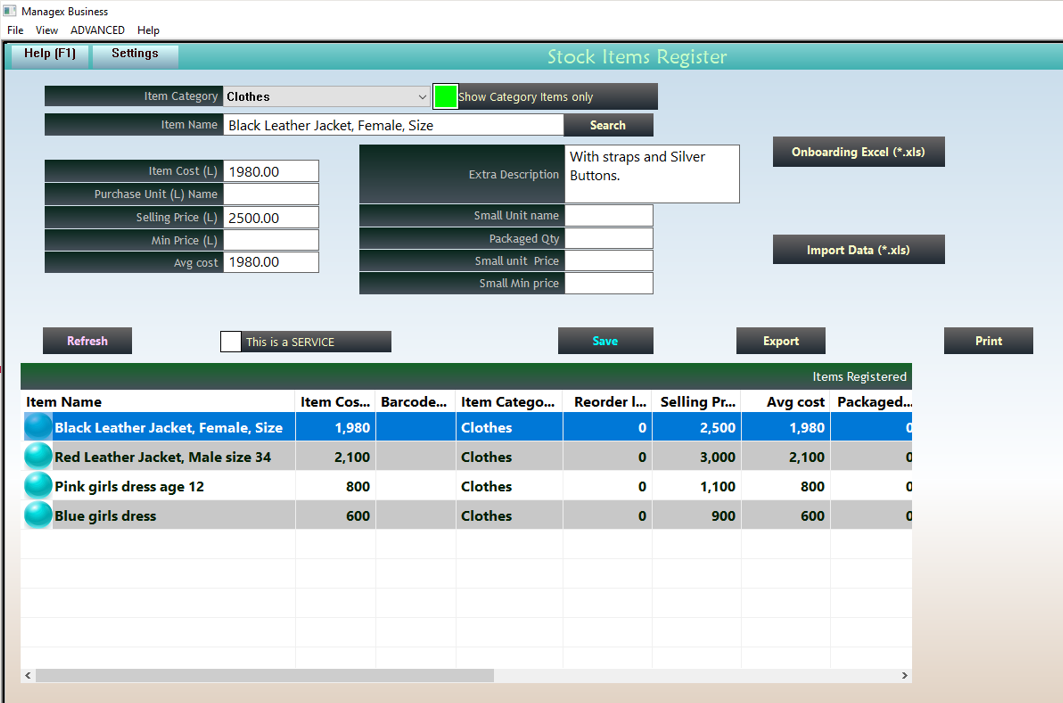
Adding Stock Items
Use this window to register goods and services that you deal with.
First, ensure from the list of categories that your categories are added.
Fields
Item Name: That is where you type the full name of the product you are selling. It should be possible to distinguish one product from the other. Brown Sugar 1kg, White Sugar 1kg and not just Sugar.
Item Cost (L): For the large or default unit. Some items can be split into smaller units (e.g Packet has 12 pieces), so the larger unit’s cost is the one that you put. If the item doesn’t have smaller units, then just put the cost here and ignore the right side that asks for the small units details.
Purchase unit name (L): Large or default unit name (e.g. Kg, Pcs, Acre, Car, Bag, Carton)
Selling Price (L): Selling price for the large/default unit.
Min Price (L): This is the minimum price the large/default unit can be sold.
Barcode: Is the product barcode, you can scan or type it by first clicking to put the cursor in the box.
Average Cost: The system applies average cost to determine stock value. Should you manually edit the L cost of item and the average cost seems to not make sense, then you can edit it. Otherwise, leave the system to manage it.
Extra description: Use this to describe the product or service. For example, if it’s if its land you can specify acreage details, car or electronic specifications etc.
This is a service: by ticking this green, it means the item will be saved as a service that doesn’t need stock to sell.
- Ignore the following fields if the item cannot be split into smaller packet units;
Small units name: is the name of the small units, if the item can be split.
Package Qty: Number of small units in large units
Small Unit Price: The selling price of the small units.
Small units Min price: The minimum price below which you can sell the small items. Leave it at zero if you don’t want to limit it.
The save button enables you to save the data, and double-clicking an item (twice) returns the data from the list view so that you can edit and save it again.
Import From Excel
To upload bulk data from Excel
First ensure that you have microsoft excel installed in the computer.
The upload is done per category, so select one category.
Click on the 'Onboarding Excel' button.
Check for the template excel file that will pop up.
Fill in the rows with the items details for the given columns.
When done save the file in a public folder (like documents or desktop) and rename it.
Click the 'Import data' button and browse to the file.
The information will be uploaded instantly.

